

Consultant’s Corner: Settings Lockdown for Advanced Laserfiche Administration
- Kyle Knebel
- Jul 15, 2019
- 3 min read

This month’s CDI Consultant’s Corner focuses on Laserfiche’s Settings Lockdown for Advanced Laserfiche Administration. We took a moment to sit down with Kyle Knebel, Software Trainer, here at CDI, to give us a quick overview on these advanced settings.
Kyle, what is Laserfiche Settings Lockdown?

With Settings Lockdown, you can limit the ability of a user to change certain sets of options in the Windows Client and the Web Client; either for the entire repository or for specific users or groups.
A Laserfiche Administrator can go into the Everyone Group properties and create a new [Lockdown] entry in the attributes tab. The Settings Lockdown prevents that user or group from changing specified Options in that locked category.
1. What types of settings can be secured using the Laserfiche Settings Lockdown?
There are 5 different categories of settings you can lockdown. These categories are:
SearchSettings - for example, search results limits and fuzzy search settings
DocViewPanes - prevents affected users from opening, closing, or rearranging the panes in the Laserfiche Windows client's document viewer - this setting has no effect on the web client.
AnnotationStyle - all annotations created by affected users will be public annotations
QuickSearch - control which searches will be performed when affected users use the quick search bar in the Laserfiche web or Windows client.
AdvancedImport – for example, PDF image page generation, default volume, or document name conflict settings.
For more information about the specific settings that can be locked in each of these 5 categories, go to the following Laserfiche Support Site URL here.
2. How do you implement the Laserfiche Settings Lockdown?
There are several steps in locking the settings for a user or group.
First, you will want to set the defaults for each of the specific settings to be locked in the categories. This means that in the Everyone Group’s attributes tab, the administrator will pre-configure any settings they want to make as the default for the user or group being locked.
Note: each category has several options, but you don’t have to set them all, just the ones you intend on locking down.
Next, you’ll need to obtain the SID (Security ID) of the user(s) or group(s) you want to lock down. The administrator will need to navigate to the Users and Groups node in the Laserfiche Admin Console, highlight the user or group, and then Export the trustee XML. (You’ll save it locally, and then view the XML file to find the SID number.) Do this for each trustee you will be locking down. You can right-click on the trustee, choose All Tasks>Export as XML. Or highlight the trustee and select Action>All Tasks>Export as XML from the File Menu.


Open the file and look for the SID number. It looks something like “S-1-1-0” or it could be longer, as shown in the example below.

Then, you will lockdown the overall category.
Note: Since Settings Lockdown is applied to specific users or groups, those who are not affected can change their Options settings at any time. However, they will be assigned the same default settings you applied prior to locking down the settings.
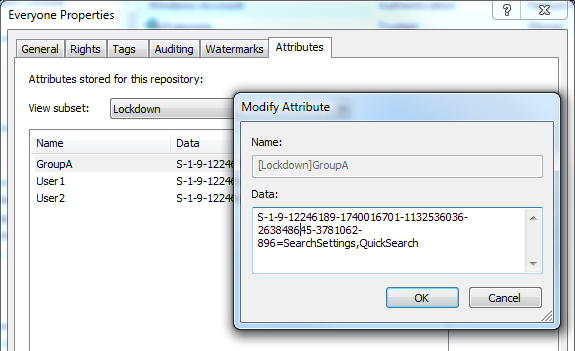
To Lock Down a user or group, you will proceed to the Everyone Group properties and click on the Attributes tab. Click on the View Subset list and select “Lockdown”.

Press the Add button on the right side to configure the attribute for this user or group. You will need to configure a separate attribute for each user or group to lock down. To lock a setting for all users, lock the Everyone Group (SID: S-1-1-0).
Here’s an example of the syntax for the attribute:

Below is an example of a Lockdown attribute fully configured. (this example SID is made up – don’t use it in your system!)

Once locked down, when the user goes to their options settings they will see a message informing them that some settings have been locked, see image below.

3. What are recommended best practices when using Laserfiche Settings Lockdown?
We recommend as a best practice that you only change the defaults on the least amount of options, so that you don’t overly impact those users (possibly the majority) with settings they will need to change.
Use the attributes of a user that you have tested with, then copy their attributes to the Everyone Group. Once they are copied, then you can add the Lockdown attributes for each user or group that will be restricted.
Thanks, Kyle! Great information, as always.
If and when your organization needs to limit Laserfiche options for your repository or just for specific users or groups, you’ll now have the how-to knowledge to take control. If you have questions or would like more information on these settings, be sure to contact the CDI consulting team for further assistance.


Comments