

Using Handwriting Recognition in Laserfiche Cloud
- CDI
- Jan 25, 2023
- 4 min read

Updated: Jan 26, 2023

By Kyle Knebel
January 2023 Consultants Corner
As a Laserfiche Cloud Administrator or Process Designer, you have a new tool in your arsenal. Handwriting recognition is now built into the Capture Profile suite of Process Automation tools. Capture profiles and extract data from documents to be used in a business process. These profiles can extract both typed and handwritten data. This month’s article will focus on building and using a capture profile to capture data from a U.S. Federal W-4 form.
Below is an example of a document with the template fields filled with the handwritten information from the scanned W-4.

So how do we build this so that a form, such as this W-4 Federal Employee Tax Withholding Certificate, can be scanned to the repository and the information captured from it?
We’ll need to do two things, build a Capture Profile and then use it in a Workflow. Both of these steps are done in the Process Automation area of Laserfiche Cloud.
Step 1: Build the Capture Profile
Navigate to “Process Automation” by selecting it from the Application Selector at the top-right of the Cloud interface.

Select the “Capture Profiles” tool on the Process Automation screen to build a capture profile.

Next, select New > Capture Profile and name it.


You’ll then want to upload a sample document. Click add a sample document to add one or more images (.png, .jpg, .gif, .bmp, and .tiff) or .pdf files that are samples of the pages you want to capture data from.


Having selected your sample document, preview your sample document, then press Save.

The sample file will upload, and then you can add Zones around the areas where the text will be captured.

In the Profile Editor, you will move your cursor to the top-left corner of the area you want to “box” and then drag while holding down on the mouse button. The cursor will look like a “cross-hairs” icon, as highlighted below.

Drag down to the bottom-right corner of the area to be “boxed” and release the mouse button.
Best Practice: The green zone box will grab nearby text, so it’s better to make the box a bit smaller and tighter to the area in which text will typically be found.

It will then pop up with a Zone dialog box. Choose “Text” unless you are reading a Barcode. Give the Zone a name, like “First Name” or “SSN,” etc.
Best Practice: Use the “Relative” Zone position to improve the accuracy of captured data by automatically adjusting the zone position to account for the shifting of the page's text.
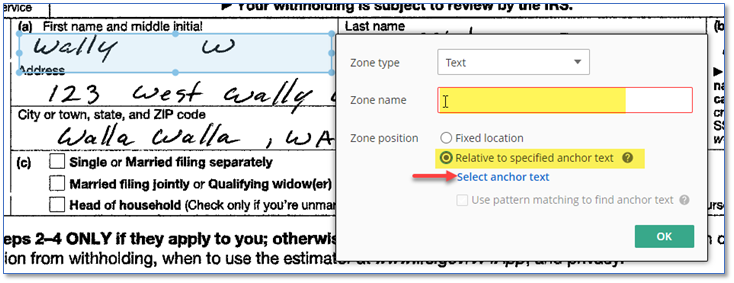
Press the blue “Select anchor text” link in order to mark the anchor text. In the example below, I’ve used the word First as the anchor point.

Once you’ve marked the anchor point, press OK to save the Zone settings, and continue this process until you have all your zones configured. Just remember that the information in these zones will be used later in your workflow as tokens.

Make sure that the Zones are capturing the correct values and no more.

Finally, press the Publish button at the top-left to make this Capture Profile ready for use in a Workflow.

Step 2: Build the Workflow
The workflow you will build can be started by many different conditions or schedules, so I won’t go into those options now, but the workflow design itself is fairly straightforward.
Navigate to the Workflow Designer, Select New, Name your new workflow appropriately, maybe “Handwritten W-4 Processing”, and begin editing the workflow.
The workflow will use the “Run Capture Profile” activity, which can be targeted to the workflow’s starting entry or a different entry. Of course, the affected entry should be a handwritten W-4; otherwise, the capture profile will not grab the expected values.

Configure the properties of the “Run Capture Profile” activity so that it uses the profile you just built in Step 1. I’ve decided to run my workflow against the “Starting Entry,” and It will use my Capture profile, and it’s the latest version.
Best Practice: If you have gone back to edit your capture profile, you will need to refresh the profile version being used, as indicated below by the green checkmark. Use the Refresh button next to the “Manage capture profiles” to update the workflow with a list of the latest versions of your capture profile. Then select the most recent Major version.

At this point, you could add a Rename activity or other activities that would use the values captured from the W-4.
I renamed my document using static text and the capture profile values.

I selected the Capture profile tokens from the previous activity.

Then I added a third activity to apply the Field Values to a template, which will be assigned to the Starting W-4 document.

With these three activities running on the W-4 document, it will get renamed and the metadata assigned by the workflow.
At this point, you can expand and enhance your workflow as appropriate to your needs, but this simple example should get you well on the way to using Laserfiche Cloud’s new Handwriting recognition capabilities. I think you’ll find it incredibly useful.
Happy New Year from all of us at Cities Digital!

CDI NEWSLETTER
Stay up to date with all the latest Laserfiche news, CDI webinars, blogs, and more!


Comments