

Getting Ready to Launch - Setting up Laserfiche Mobile
- CDI
- Nov 18, 2022
- 6 min read

Updated: Nov 25, 2022

By Kyle Knebel
As a Laserfiche Administrator, at some point, you may want to give your Laserfiche users some freedom, some mobility, dare we say it, some “Mobile App” access to their Laserfiche Forms and Repository. Your users can download the Laserfiche App for their iOS, Android, or Windows devices to connect to a Laserfiche repository. And they could even download Forms for offline use. Once you’ve set up and configured the Laserfiche Mobile Server, your staff can connect to the Mobile Server through the App.
So, what’s the strategy for getting Laserfiche “mobile”? Do you want users to import documents from Cloud-based services like Google Drive, Microsoft OneDrive, or OneDrive for Business? Do you want to enable image processing on the Laserfiche Mobile Server? Do you want to support Microsoft Office Online Server, Esri ArcGIS Maps, or Google Maps?
Preparing to support mobile users using the Laserfiche App requires that you have the Laserfiche Mobile Server configured, as we will explain below, and some minimum system and software requirements.
System and Software Requirements
Laserfiche recommends that you have a web server with 64-bit or Dual-core processors and a minimum of 2 GB RAM running Microsoft Internet Information Server (IIS) 7.0. You must have Laserfiche RIO or Avante 8.3 or later installed.
Additional requirements are to be found here: https://go.laserfiche.com/support/webhelp/laserfichemobile/10/en-us/lfmobile/lfmobileadmin.htm#Installation_and_Configuration/Requirements.htm%3FTocPath%3D_____2
Laserfiche Mobile Server
Install the Mobile Server on your server. Note, if you are going to enable image processing (the OmniPage OCR engine), then it is highly recommended not to install on a machine that also hosts the Laserfiche Server or Laserfiche SQL database.’
Follow the steps to:
Select the Language
Accept the license agreement
Choose the Setup type (Typical, Complete, or Custom)
Provide the Activation key, Activation file, or list the LFDS RIO server with which to license the software
Set the Laserfiche Service Settings, which is the default account the Laserfiche Web App Service should use when IIS is configured for anonymous authentication.
Allow IIS to be reset.
Proceed to the Mobile Server Configuration Page or run
Cloud Import Services
Cloud Import Services must be installed on the same computer as the Laserfiche Mobile server with which it will be used.
Follow the steps to
Select the Language
Accept the license agreement
Run the Custom Setup if a new location is desired; otherwise, choose the default.
Allow the installer to verify prerequisites and click Run to check and install any missing Microsoft components.
Finish the installation wizard.
Once you have installed Cloud Import Services, you will need to link your repository to the relevant cloud servers, which is done on the Laserfiche Mobile Server Configuration page.
Laserfiche Mobile Server Configuration page
This image is a screenshot of the main Configuration page. We will step through the sections like Connection, Security, General, etc.

Connection
Here you will connect the Laserfiche app to a repository and determine how users will authenticate to that repository. You can add a Forms server and a connection to the Laserfiche Directory Server to take advantage of Single Sign-On functionality.
At the top of the screen, you can click the Import Web client Configuration link to import the web client repositories, the Windows and/or repository users allowed or denied access to the repository, and the Laserfiche Directory Server settings onto the Laserfiche Mobile Server Configuration page.

Select the first option to import the web client settings from your current machine.
Select the second option to import the web client settings from another machine. Then, enter the web server machine name or URL in the top text box (For example, https://machinename/laserfiche) and the credentials to access the Web Client Configuration page.
Press Import when finished.
Note: You must have the right to remote into the webserver to import the web server configuration page settings.
If you want to make it easier for your users to open the Laserfiche app and sign in, you can create a link using the Generate link to open and auto-populate the app Sign-in page link.

Enter or select the repository you want automatically populated on the app Sign-in page.
Enter or select the Forms server you want automatically populated on the app Sign-in page.
The read-only link will be displayed at the bottom of the dialog box. Press Copy Link to copy the newly generated URL
Next, you’ll want to set your Repositories Settings.

If the repository is not already loaded, click the “Add new repository” link. For any repository, set the Domain name and default Volume, Authentication, and Allowed/Denied accounts in the Repository Settings section.

If you have a Forms server and you are using Offline Forms, you’ll want to configure a Laserfiche Forms Server.

1. In the Forms server name (optional) box, type an alias for the forms server you are adding.
2. In the Forms server URL box, type the URL for the Laserfiche Forms server where the forms are located.
http://LaserficheFormsServer/Forms where LaserficheFormsServer is the name of the Laserfiche Forms server containing the forms you want users to have access to. Be sure to enter http:// or https://, a fully qualified domain name (FQDN), and a forms virtual directory (i.e., http(s)://FQDN/FormsVirtualDirectory or http(s)://mycomputer.laserfiche.com/Forms).
Example: http://myforms.laserfiche.com/Forms
Note: You can use https:// to use SSL and secure your connection.
3. If the Forms server added has been configured to use Laserfiche Directory Server, you must select the SSO checkbox and ensure the Forms server has been registered by the Laserfiche Directory and licensing site configured under the Laserfiche Directory Server section of this Configuration page
4. Once the Forms server details are configured, press Add. To remove a Forms server, press the.
Note: Select the radio button next to the Forms server you want the Laserfiche app to connect to by default.
5. Set the Forms Server Settings

Finally, you’ll set the Laserfiche Directory Server information.
Configuring the Laserfiche Directory Server section lets users take advantage of the single sign-on feature. If the Laserfiche Server, Laserfiche Forms, and the Laserfiche app have all been registered to the same Laserfiche Directory Server, signing in to one application will automatically sign in to all.

Note: The Laserfiche Server, Laserfiche Forms, Laserfiche Mobile Server, and Laserfiche Directory Server must be on version 10 or later to use the single sign-on feature.
Security
The Security section on the Configuration page enables you to define certain security options, whether to disable exporting to other apps and whether to display watermarks on document images.

Notice that you can encrypt Laserfiche electronic documents in the devices' local file system. Encrypted documents can only be viewed by someone with appropriate rights in Laserfiche. Enable this feature by clicking the 2nd check box in the list titled “Encrypt Laserfiche electronic documents stored in devices’ local file systems.”

A companion setting can be set to prevent users from exporting electronic documents from the Laserfiche app to other applications on their mobile device by setting the “Prevent users from exporting to other apps…” check box.

General Notes: If you use the iOS, Android, or Windows app with Laserfiche Mobile 9.0 or earlier, electronic documents will be encrypted even though this option is not available during configuration.
Important: For the iOS app, if you choose to encrypt Laserfiche electronic documents, the device must have a passcode set to ensure complete security. When a user opens an electronic document in the app, a decrypted version will be generated. If a passcode is set, the decrypted version will be protected by iOS encryption after the device locks.
Export Note: Compressed PDFs may result in low-resolution documents.
Watermarks Note: Tag watermarks will be displayed regardless of whether this option is selected or not.
You can only configure watermark settings if you have the Watermark feature on the Laserfiche Server housing the repository.
General
The General section on the Configuration page lets you configure the Laserfiche app email properties, who can access the Laserfiche Mobile Server Configuration page, set different logging levels, turn to trace on or off, and enable or disable JPEG compression in the app. Most of these are self-explanatory.

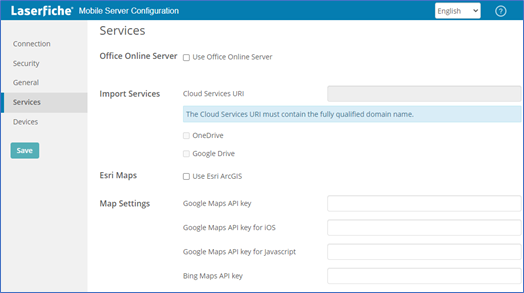
Services
The Services section on the Configuration page lets you configure Microsoft Office options to edit Office documents in the app, import options to import documents from OneDrive and Google Drive, and map options to use the map feature in the app.
Devices
In Laserfiche Mobile 9.2.1 and later, there is a Devices section on the Configuration page. This section lets you monitor and search for each time a user signs in and out of your repository and Forms servers from specific devices. You can also block certain devices from accessing the Laserfiche app.

Pressing the green Search button will show the search results in the Log section. You can navigate through the log by clicking the page buttons at the bottom of the Log section.
The Log section can be filtered by defining search criteria in the section above.
The Blocked Device section allows you to select a device shown in the Log section and then mark it, as shown below.

We hope you found these strategies and guidelines useful as you plan your implementation of the Laserfiche App. Give your users a sense of freedom and mobility to see and interact with Laserfiche content, no matter where they work!

CDI NEWSLETTER
Stay up to date with all the latest Laserfiche news, CDI webinars, blogs, and more!


Comments