What You Need to Know About The Adobe Sign Integration
- CDI
- Aug 18, 2021
- 4 min read

By Julio Velela
The Laserfiche Integration with Adobe Sign is a game-changer for all self-hosted customers. Adobe Sign will allow developers across your organization to build robust processes that collect e-signatures with complete ease. In addition, you will be able to upload documents for signing, request, and track signatures using different role assignments and store signed documents in the Laserfiche repository.
Using this excellent integration requires customers to have the following:
Laserfiche Forms 10 and above
Laserfiche Workflow
Laserfiche repository
Forms server
Adobe Sign enterprise licensing
For more information on licensing, go to Adobe Sign for enterprise and business at https://acrobat.adobe.com/us/en/sign/business.html.
Adobe Sign can fulfill your digital signature needs with more than 8 billion transactions processed from millions of signers worldwide. You can also expect greater efficiency and security since to help protect sensitive information, Adobe Sign follows industry-standard security practices and encrypts all documents. On top of that, Adobe e-signatures are legally valid and enforceable in nearly every industrialized country worldwide.
Where to Find the Form Process
The Adobe Sign integration can be found in Laserfiche Business Process Library under Adobe Sign – Send for Signature Forms. Users will be able to upload a single file to Adobe Sign and send it out for signature. Workflow uploads the document to the Laserfiche repository and sends it to Adobe Sign over HTTPS upon submission. Signers will then receive an email requesting a signature and a link to the document in Adobe Sign.
This process uses the following forms:
Upload Documents for Signature
Adobe Sign User Interface
This process calls the following workflows:
[AdobeSign] – Forms Signature Invoke
[AdobeSign] – Forms Wait for AdobeSign UI

As with all Laserfiche Business Process Library processes, you can adjust this workflow to fit your needs. The workflow can be applied to different processes to send documents for signature using Adobe Sign.
How to Get Started
Step One:
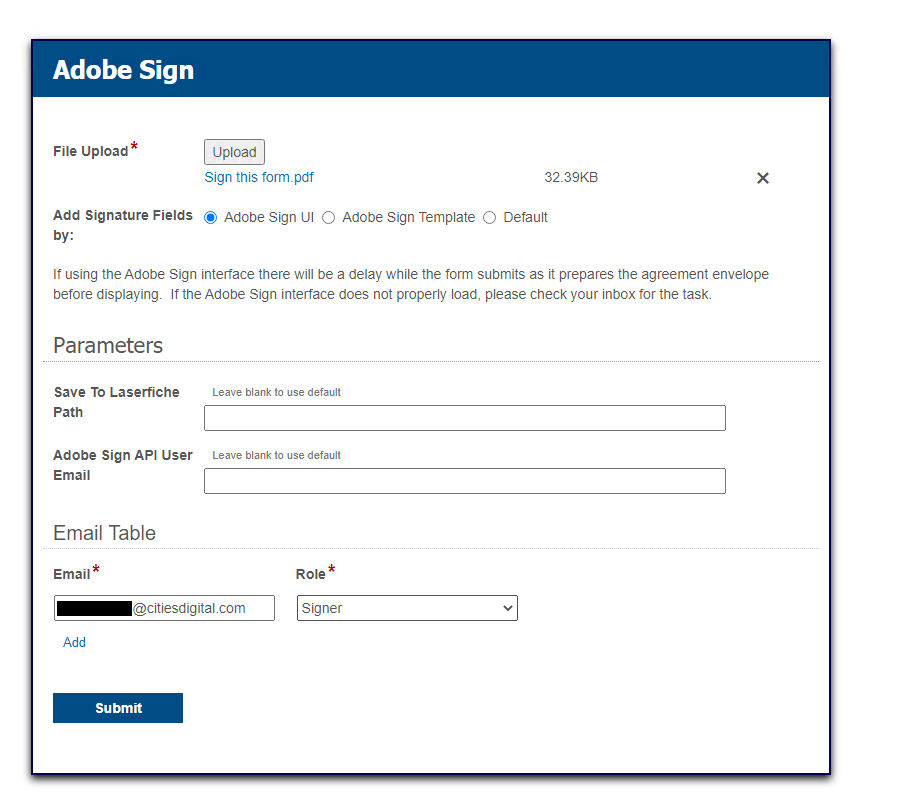
Select the Adobe Sign – Send for Signature Forms process and upload Documents for Signature Form

To upload a file for signature, select the Upload button. You will then need to browse your computer for the file you want to use.
Note: Only a single file can be sent to Adobe Sign. If multiple files are attached, an error similar to the following appears:

Step two:
Select how signatures are added to the document
Using the Adobe Sign UI: To use the Adobe Sign UI, select Adobe Sign UI. When the form is submitted, the Adobe Sign user interface will appear.

Using an Adobe Sign Template: To use an Adobe Sign template, select Adobe Sign Template.

In the Adobe Sign Template box, enter the name of the template. Note: The name of the template needs to match exactly as it appears in Adobe Sign. If the workflow cannot find the template, it will follow the path for the Default option.
Select the option for the email sender you want to use. For example, if you select Adobe Sign, the email will come from Adobe Sign. If you select Laserfiche, the Workflow server will send the document for signature.
Using Default Signature Fields: To use the signature fields already in the document or to have Adobe Sign add a signature field on the bottom of the last page, select Default.
Step three:
Select the option for the email sender you want to use

If you select Laserfiche, the Workflow server will send the emails using its default setting.
Step four:
Select the Parameters you want to change

Enter the full path in the Save To Laserfiche Path box to change the repository location where the uploaded file is stored. Otherwise, leave the box blank to use the default path.
To change the Adobe Sign API user, enter an email address in the Adobe Sign API User Email box. Otherwise, leave the box blank to use the default API user.
Adobe Sign User Interface Form
If you select Adobe Sign Template or Default on the submission form, the document will be sent to Adobe Sign for signature. If you select Adobe Sign UI on the submission form, a second form appears. The second form uses an iframe to display the Adobe Sign user interface.
From a user perspective, the form appears similar to the following:

From a recipient perspective, the form appears similar to the following:

Why use Adobe Sign?
Adobe Sign can take your internal approvals further by automating e-signature requests from external parties.
Feel secure with your sensitive data with Adobe Sign’s industry-standard security practices.
Launch the process and apply it to workflows without requiring coding effort.
It is exciting that Laserfiche and Adobe have teamed up to create this incredible integration. If you are a self-hosted customer of Laserfiche products, don't wait to utilize this tool for your e-signature requests. Streamline your processes and make it easier for people to sign internal and external documents from your organization. This is still a new integration, and there is little content out there covering the full potential of this feature. CDI will keep tabs on any updates and changes that Laserfiche releases on the Adobe Sign integration. Meanwhile, don't hesitate to contact our support team at support@cdi.support if you have questions or want to learn more.

CDI NEWSLETTER
Stay up to date with all the latest Laserfiche news, CDI webinars, blogs, and more!
If you have any questions regarding Laserfiche or wish to speak with a CDI professional team member, contact us at support@cdi.support.


Comments