

Managing Physical Records With Laserfiche Records Management Edition
- CDI
- Sep 17, 2021
- 2 min read


By Kyle Knebel
This month’s Consulting Corner article will cover using Records Management edition features to manage physical boxes and documents. This article will address a simple need to handle paper-based content that can't be scanned into your Laserfiche system, maybe already housed in a warehouse, is only occasionally retrieved, and will eventually be destroyed. If you are already a seasoned Laserfiche administrator or Records Manager, this will be very straightforward.
The steps will include an example template to be applied to “0-page” documents, then placed under Records Management and managed using the Laserfiche Records Management module features.
Here’s how we can accomplish our management of “Physical Records.”
1.) Configure a Template for use with your physical records
Using your Laserfiche Administration/Management Console, create a new template, for example, “Physical Records,” as shown below.

2.) Add physical boxes as document entries in the Repository
As of Laserfiche version 10.4.1, you have been able to apply Records Management (RM) properties to content without being constrained by a Records Series structure so that the following steps can be applied to entries regardless of their location in the repository. However, if you already have a formal Records Series structure, one should keep using it since the inheritance of RM properties makes life easier.
In the appropriate location, whether it be a Records Folder under a Records Series or standard folder, create a 0-page document. You could use Laserfiche Workflow to deal with many copies, but we’ll create one manually for now. If the document is made in a Record Series or a Records Folder, the RM properties will be inherited.
Apply the template that you created, like the “Physical Records” template example in Step 1.
If this document doesn’t live in a Record Series, ensure that the appropriate Records properties are assigned to the document to manage its RM life cycle.

Manage the documents as you would for any other “Records,” but remember you will have to go out and physically destroy the box when you do the same in Laserfiche.
You can then run searches (reports) for these documents using a custom search using the template and records management properties, like ready for cutoff or ready for destruction. If all your records are managed using Records Folders, you can use that search instead of a search by Records. If possible, a best practice is to maintain records in a Records Folder, thereby reducing the need to manage individual records documents.


Top Tip: Laserfiche Workflow can be used to send emails with a list of records ready for records management activities, like being Cutoff or Destroyed.
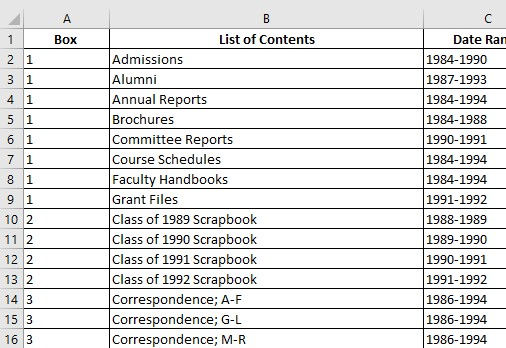
Many users already have an index of record inventory attached to each box. If this inventory is contained within Excel or another database, it can be imported into Laserfiche using Workflow to create the physical records in Laserfiche automatically.
If using the Laserfiche Mobile App, you may also use barcode scanning from your mobile phone if the box or record contains a barcode. This allows users to search for records associated with the box index when standing in front of the physical records.


CDI NEWSLETTER
Stay up to date with all the latest Laserfiche news, CDI webinars, blogs, and more!


Comments